Showing posts with label Swatch. Show all posts

Friday, 15 March 2013

17 Rock Hard Nail Effects: Textured Nails Review

This past couple of months has seen an expolsion of textured nail polish's hit the nail blogging community. I personally love the look and from the swatches I've seen I think Nails Inc -Leather Effect is incredible. Leather on my nails? Oh, go on then. Nails Inc knows me too well. However, at £19 a pop (although you do get some skull nail decorations in the set...very tempting) it's a little steep on the price range. 
With that in mind I give you Rock Hard Nail Effects by Seventeen, a Boots own brand. This collection claims to give you Matt finish 'gritty' textured nails in two coats. And for only £3.99 each that's a lot more purse friendly to me! At the minute Boots have an offer on all Seventeen cosmetics; buy one get one half price. Bargain.

 Here is Black and Grey from this collection.

Black

To me this could almost be a dupe for Nails Inc - Leather Effect. I realise there are differences in the shine and 'grittyness' but from afar, would you really be able to tell the difference? I absolutely love this polish. It's perfect for leather-jacket-wearing type girls such as myself. Application was great and it was opaque in two coats.
Read on for more pictures..

Monday, 11 March 2013

Seven Days of Sally Hansen: Day 7 - Anemone of Mine

Last but certainly not least in the Seven Days of Sally Hansen, is Anemone of Mine.
The colours on my pictures are somewhat not exact, its a lovely warm purple in natural light. I guess my spot light just didn't like the colour. Regardless, whatever way you look at it, it's a lovely colour. And opaque in one coat, although I used two here. It's also a little nasty on the staining so be sure to use a base coat!
Read on for more pictures..

Sunday, 10 March 2013

Seven Days of Sally Hansen: Day 6 - Fairy Teal

Contain yourselves ladies. It's Fairy Teal *swoon*

I've been lusting after this colour for absolutely ages. I don't think I've done the colour much justice in my pictures but this is a gorgeous teal creme and was opaque in two coats. As the CSM collection supposidly includes a base coat, you would think that you shouldn't need a base coat with this colour. Wrong. If you're going to use this colour, wear a base coat!! Nonetheless, it's an incredible colour and I love it!
Read on for more pictures..

Saturday, 9 March 2013

Seven Days of Sally Hansen: Day 5 - Green Tea

Hello dolls. I'm back with day 5 of my Seven days of Sally Hansen feature. This little stunner is Green Tea.
This is the perfect mint green and I don't have anything like it in my collection so this is a real winner and definitely one of my favorites of the CSM collection. This colour is perfect for the upcoming spring time and is really refreshing. This is two easily applied coats.
Read on for more pictures..

Friday, 8 March 2013

Seven Days of Sally Hansen: Day 4 - Gray by Gray

Ladies, I'm in love. Meet Gray by Gray
This is a slate blue/grey and is the most perfect blue I own. It suits my skin tone perfectly. Application was a breeze, this is two coats.
Read on for more pictures..

Thursday, 7 March 2013

Seven Days of Sally Hansen: Day 3 - Dorian Grey

Day 3 of my Sally Hansen week is here! This is the lovely Dorian Gray.

What a beauty! Its a sort of blue-tinted pale grey and a really sophisticated colour. This is three thin coats..
Read on for more pictures...

Wednesday, 6 March 2013

Seven Days of Sally Hansen: Day 2 - Lavender Cloud

Here is day two of my Sally Hansen Swatch week. This little beauty is Lavender Cloud

Like Crinoline, this is off-white but with just a hint of lavender this time. It is almost impossible to capture that slight hint of colour and so my pictures don't do it justice. This is three coats as I found two didn't give it enough opacity and left it a little streaky.
Read on for more pictures..

Tuesday, 5 March 2013

Seven Days of Sally Hansen: Day 1 - Crinoline

Hi ladies, I'm back and I'm back with a vegance!

You may have noticed on a lot of blogs lately that people have been finding high branded polishes in Poundland. Yes, thats right, the shop were everything is £1! Over the past couple of months I've been heading into Poundland and TJ Hughes every time I've been to town and I've managed to get my hands on a fair few Sally Hansen Complete Salon Manicure polishes. 
This range claims to be a 5-in-1 fix for the on-the-go woman. That is a base coat, strengthener, growth treatment, colour and top coat. What more could a girl want?
I have that many now that I have decieded to do a Seven Days of Sally Hansen week!

First up we have the lovely Crinoline. This is a lovely pinkish off-white. I reckon this will be perfect with most skin tones. It's so fresh and elegant. Application is perfect and the wide brush is my new favourite! This is three easy coats. Top coat not necassary!
Read on for more pictures..

Monday, 29 October 2012

Nail Pop (Look Beauty) - Petticoat Swatch

As I said in yesterday's post, I got a couple of Nail Pop by Look Beauty polishes from superdrug. This beauty is Petticoat. A lovely pinky nude. The polish is suprisingly opaque, this is 2 coats and a coat of Seche Vite and application was smooth. It's a really subtle colour and will suit most skin tones. Nail Pop cost £5 each but I got this and Glamrock in a 2 for £6 offer.


Sunday, 28 October 2012

Nail Pop (Look Beauty) - Glamrock Swatch

I go into Superdrug at least once a week and I almost always buy a new polish. Last week I picked up this beaty called Glamrock buy Nail Pop (Look Beauty). I wouldn't spend £5 on a bottle of polish unless I absolutely needed it, but luckily Superdrug had a 2 for £6 offer on Nail Pop so I bought this and Petticoat (more on this soon). 

Glamrock is an amazing purple glitter in a plum coloured jelly polish. It's just beautiful. Glitters are usually a nightmare to remove but this is actually quite easy. This is almost a dupe for Nails Inc - Bow Street. I finished this with a coat of Seche Vite.

It's a great winter polish. I'm in love! 


Saturday, 13 October 2012

Barry M Gellies Watermelon and Blue Plum

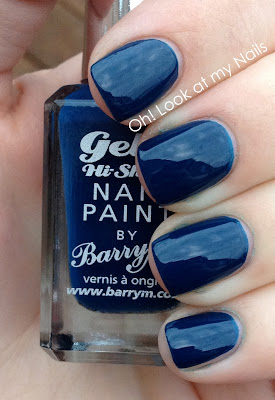
Here are two of the Barry M Gellies.  Many people thought at first that this collection was a Jelly range, as in sheer polishes. But the idea behind these is much more genius. They're meant to replicate the super shineyness of gel manicures. And ohmigawd are they shiney! These swatches are without topcoat.....SAY WHAAAT! 
Here is Watermelon and Blue Plum.

Watermelon is definitely my favourite of the collection. It's a really dark teal and a great winter polish. I struggled to get the colour right with my camera with this swatch. It looks almost black in indoor lighting and I could only get the colour in natural sunlight. I used two coats for this swatch.
Blue Plum is a deep royal blue. Again, it looks almost black indoors but the colour definitely pops when in natural sunlight. I used two coats for this swatch.


Although I used two coats for these swatches, they are very much one coaters..as they were intended to be. And they apply like a dream. There are 9 colours in this collection. The others are Plum, Pomegranate, Satsuma, Prickly Pear, Blueberry, Grapefruit and Blood Orange. The only other colours that really interest me are Plum and Blueberry. I think thats because the other colours are pretty 'normal', if you know what I mean. Although the finish on these colours is awesome. 
How have you found Barry M Gellies?


Friday, 7 September 2012

A-England St George swatch and hex qlitters

HOLLA! 

Apologies for my lack of posts this past week, I've been super busy decorating, preparing for my sisters return from America and it was my boyfriends birthday yesterday so I made him an awesome cake (pictures to follow!!)
I was ridiculously excited yesterday when my A-England St George from The Legend collection arrived and then my hex glitters from the Born Pretty Store came this morning so, naturally, I wanted to play with them both!

I thought I'd show you the awesomeness of St George on it's own. It's holographic; need I say more?! Definitely one of my faviorite polishes ever.


I then added the glitters, or qlequins as Sammy at the Nailasaurus calls them, to my ring finger using this tutorial by Sammy herself. It didn't work out as well as I'd hoped, it's very fiddly to get them in the perfect honeycomb shape but it's a funky look all the same. I topped the ring finger with Seche Vite to smooth it out.
And here is the amazing cake I spent 3 hours baking yesterday. There was even melted galaxy chocolate in the buttercream. Om nom nom!